How To Roll a Blunt: The Ultimate Guide to Slow-Burning Perfection
For many cannabis enthusiasts, learning how to roll a blunt is a rite of passage. While joints are classic and glass pipes are convenient, the blunt occupies a unique “heavyweight” status in smoking culture. It is bold, long-lasting, and deeply communal.
A well-rolled blunt offers an experience that standard paper simply cannot match. The thicker wrapper burns significantly slower, delivering a richer, denser smoke that pairs perfectly with the complex terpenes of high-quality flower. It is the preferred method for sharing with friends at a party, celebrating a milestone, or simply settling in for a long, meditative evening session.
In this comprehensive guide, we will walk you through the entire process. From choosing the right cigarillo to mastering the tricky “tuck and roll,” we will turn you from a novice observer into the designated roller of your group.

What Exactly is a Blunt?
At its simplest, a blunt is cannabis rolled inside a tobacco leaf wrapper. The term originally comes from the “Phillies Blunt” brand of cigars, but it has evolved to describe any cigar that has been hollowed out and refilled with marijuana.
Unlike a joint, which uses thin, neutral paper (often made of hemp, rice, or wood pulp), a blunt wrapper is made of tobacco leaf or homogenized tobacco pulp. This adds two distinct elements to the experience:
-
The Flavor: Tobacco wraps add a sweet, earthy, and woody profile that complements the skunkiness of the weed.
-
The Buzz: Because the wrap contains nicotine, a blunt provides a synergistic effect. The nicotine adds a mild stimulant “buzz” and light-headedness that mixes with the THC, often resulting in a heavier, more sedating body high.
Types of Wraps
Before you start rolling, you need to choose your vessel. Wraps generally fall into two categories:
-
Cigarillos: These are small, machine-made cigars (like Swisher Sweets, White Owls, or Dutch Masters) that you must split open and empty. They are popular because the leaf is consistent, easy to work with, and comes in a massive variety of flavors.
-
Natural Leaf Wraps: These are whole tobacco leaves (like Backwoods or Grabba Leaf). They are rustic, have thick veins, and are harder to roll, but they offer the most authentic, chemical-free smoke.
-
Hemp Wraps: For those who want the slow burn of a blunt without the tobacco or nicotine, hemp wraps are the perfect alternative.
Looking for a clean, tobacco-free option? Check out our [Hemp Wraps Collection] for a smooth, nicotine-free smoke.
The Preparation: Tools You Need
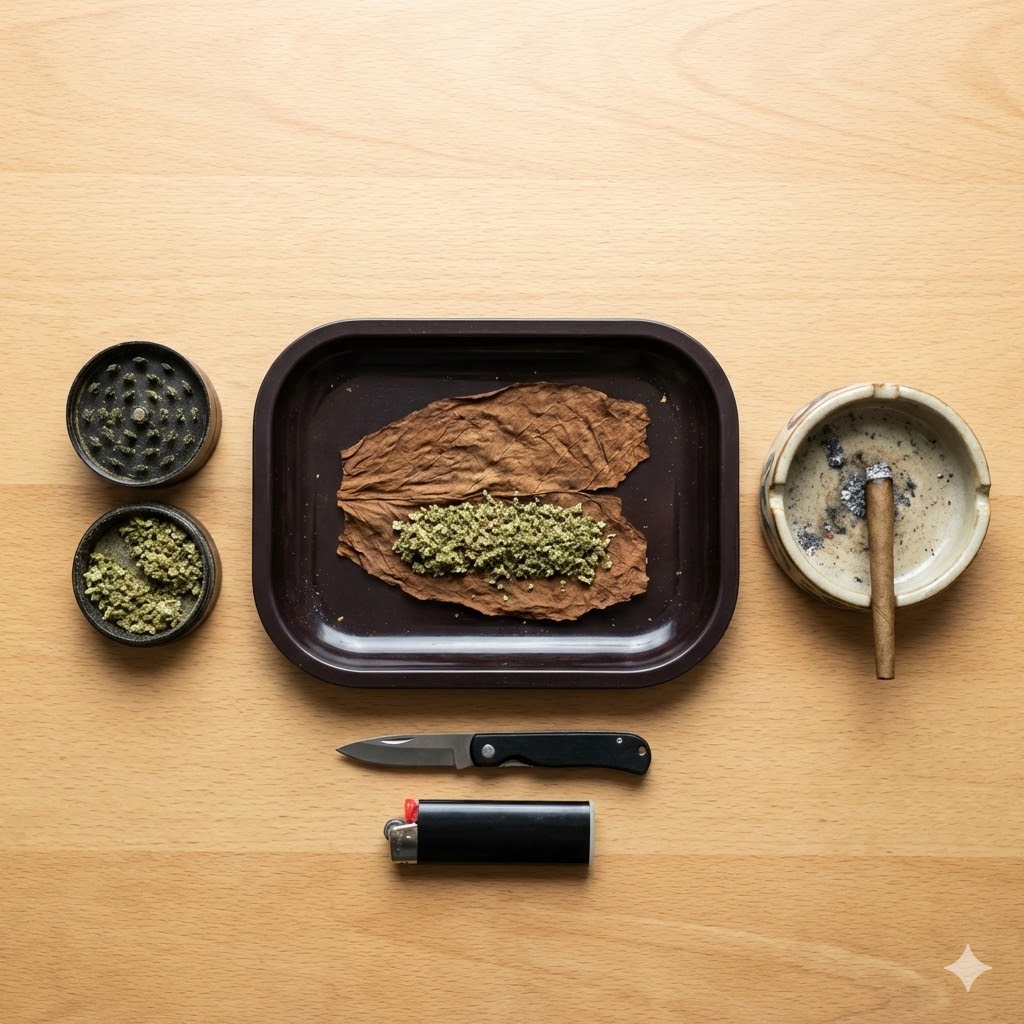
Rolling a blunt is a craft, and like any craft, it requires the right tools to get the job done efficiently.
-
High-Quality Cannabis: You will generally need more weed for a blunt than a joint. A standard blunt takes 1 to 2 grams of flower.
-
A Cigar or Wrap: Always check the package for freshness. Squeeze it gently; if it crunches, it’s stale and will crack when you roll it. You want it soft and spongy.
-
A Grinder: While some purists prefer breaking the bud by hand for a slower burn, a [Premium Grinder] ensures an even consistency and better airflow.
-
A Blade: A small pocket knife or razor blade (if you are using a traditional cigarillo that isn’t pre-cut).
-
A Rolling Tray: You will drop weed. A [Rolling Tray] keeps your mess contained and saves your precious flower.
Step-by-Step: How to Roll a Classic Blunt
Step 1: Grind Your Flower
Texture is everything. If you grind your weed into a fine powder, the blunt will be packed too tight and will be impossible to draw from. If you leave it too chunky, it will burn unevenly and “canoe” (burn down one side). Aim for a “fluffy” consistency. Many blunt aficionados actually prefer to break the buds down by hand. This preserves the trichomes and leaves small, structural nuggets that help the blunt keep its shape and allows for optimal airflow.
Step 2: Surgery (Splitting the Cigar)
If you are using a pre-packaged flat wrap, you can skip this step. If you bought a Swisher or a Dutch, you need to gut it.
-
Find the Line: Look for the straightest line along the cigarillo.
-
The Cut: Take your blade and slice the cigar lengthwise from the butt to the tip. If you don’t have a knife, you can use your thumbs. firmly pinch the cigar and crack it open, moving slowly down the line.
-
The Emptying: gently pry the wrapper open and dump out the tobacco filler. (Discard this properly—don’t leave it on the coffee table!).
Step 3: Moisture is Master
Dry wraps are the enemy of a good blunt. A dry leaf is brittle and will tear instantly. Before you add any weed, you need to moisten the wrap to make it pliable. You can breathe hot air onto the leaf to warm it up, or gently lick the edges. You don’t want it soaking wet—just slightly damp and flexible. This also helps seal micro-cracks and makes the final roll much tighter.
Step 4: The Pack
Hold the open wrap in a “U” shape (like a taco shell) between your thumb and index finger. Sprinkle your ground cannabis evenly along the length of the wrap.
-
The Center Load: Place slightly more weed in the center and slightly less at the ends. This helps create the classic “bat” shape and prevents the ends from being too loose.
-
Don’t Overfill: If it’s your first time, don’t try to stuff 3 grams in there. Start with 1 gram to make the rolling process manageable.
Step 5: The Tuck and Roll (The Hard Part)
This is the moment of truth where most beginners struggle.
-
Shape It: Start rolling the wrap back and forth between your thumbs and index fingers. You aren’t sealing it yet; you are compressing the weed into a cylinder shape inside the leaf.
-
The Tuck: Once the weed is shaped, bring the bottom edge of the wrap up and over the weed. The goal is to tuck this edge snugly under the top side of the wrap.
-
The Roll: Once the tuck is secure, roll the rest of the wrap upwards. Keep your fingers moving from the center outwards to smooth out any wrinkles.
-
Note: Be firm but gentle. If you press too hard, you’ll crack the leaf. If you are too gentle, the blunt will be loose and will burn quickly.
Step 6: Seal and Bake
Once rolled, the blunt needs to be sealed. Unlike rolling papers, cigar wraps don’t usually have a gum strip. Lick the exposed edge of the wrap liberally. Press it down firmly and hold it for a few seconds. The moisture and the natural gums in the tobacco leaf will bond it together.
-
The Bake: Run the flame of your lighter quickly back and forth along the seam (without touching the leaf directly). This “bakes” the blunt, drying the saliva and locking the seal in place. It also tightens the wrap slightly for a better burn.

Advanced Techniques: Rolling a Backwoods
The Backwoods blunt is often considered a status symbol in the cannabis community. These rustic, rough-cut cigars are made from whole tobacco leaves and are notoriously difficult to roll because of their irregular shape and thick veins.
-
Unroll, Don’t Split: Do not cut a Backwoods. Find the seam where the leaf is rolled and carefully peel it apart in a spiral motion.
-
Wash the Leaf: Many rollers choose to rinse the leaf in water to remove excess nicotine and dirt, then pat it dry with a paper towel. This makes the leaf incredibly pliable and easier to work with.
-
Pack Heavy: Backwoods are large and designed for significant amounts of flower (2g+). Don’t skimp on the filling, or you will be smoking mostly leaf.
-
Follow the Vein: When rolling it back up, you have to follow the natural spiral angle of the leaf. You aren’t rolling straight; you are rolling diagonally.
Troubleshooting Common Blunt Problems
Even experienced rollers run into issues. Here is how to fix them and save your session:
-
The Canoe: This happens when one side of the blunt burns faster than the other. To fix it, lick your finger and moisten the side that is burning too fast. This slows down the burn on that side, allowing the rest to catch up.
-
The Plug: If the blunt is too tight and you can’t draw air, you likely overpacked it or rolled it too wet. You can try using a toothpick or a small poker to create a hole through the center (the “plumber’s joint” method) to create an airflow channel.
-
The Crack: If your wrap cracks during rolling, don’t panic. You can perform surgery using the sticky gum strip from a standard rolling paper. Just tear the glue strip off a Zig-Zag and use it as a “band-aid” to patch the hole.
Blunt Etiquette: Puff, Puff, Pass
The blunt is a social device, and with it comes a set of unwritten rules that every smoker should respect.
-
Roller’s Rights: The person who rolls the blunt sparks the blunt. They get the first few hits to ensure it is lit evenly and drawing correctly before passing it on.
-
Don’t Nurture It: A blunt is not a microphone. Don’t hold it while telling a long, winding story. The blunt is burning whether you hit it or not. Take your hits and pass it to the left.
-
Ash Before Passing: Don’t hand your friend a blunt with a precariously long ash that’s about to fall on their lap. Tap it gently in the ashtray before passing it along.
Conclusion: The Art of the Slow Burn
Learning how to roll a blunt takes patience, dexterity, and a bit of practice, but the reward is worth it. There is nothing quite like the satisfaction of sparking a perfect, pearled blunt that you rolled with your own hands.